How to Set Up a Blog in Showit (with WordPress)
If you’re ready to start blogging on your Showit site, you’re in the right place. Showit connects with WordPress to handle the blogging side of things, allowing you to design your blog pages in Showit while publishing posts directly through WordPress. This guide will walk you through the process step by step.
1. Understanding How Showit + WordPress Work Together
Showit uses WordPress as the content management system for your blog. This means:
- You design the blog layout (the design of the blog pages) in Showit.
- You write and publish posts in WordPress.
- Once connected, your WordPress blog posts will automatically appear on the Showit-designed pages. So another way you can look at it is that WordPress uses your Showit designed blog pages as templates.
- It’s easier than it sounds. It’s can all be set up in under 10 minutes
2. Subscribing to the Showit + Blog Plan
To enable blogging, you need to have the Showit + Blog plan. This plan allows you to integrate WordPress into your Showit site.
- Go to your Showit account and upgrade to the blog plan.
- After upgrading, Showit will guide you through connecting WordPress to your site.
- You can even migrate your blog posts from your old website to your new Showit + WordPress site
- To connect or migrate a blog to current Showit site follow the steps that are explained here.
3. Editing Design of Your Blog Feed in Showit
While blog posts’ content is managed in WordPress, the design of your blog feed (sometimes called blog list or even blog home page) is fully customizable in Showit. Your Designorina template came with all the necessary blog pages, so the heavy lifting is done for you. Now here’s how to access these blog template pages and edit them with your branding:
- Under the Site Tab on the left side of the screen scroll down until you see the section with Blog Templates. Open the Blog template in Showit (labeled “Blog” or “Blog Feed”).
- On this page you can manually edit the fonts, colors, backgrounds, and layout by selecting text boxes or images and adjusting the properties in the right-side panel.
- Remember that you shouldn’t add your blog posts manually here. The post list canvas is set up to pull posts from WordPress automatically. It’s all set up so that once you connect your WordPress and publish your blog posts, this page (in live mode) will show all your blog posts. The placeholder images and post titles will automatically update with your actual blog content from WordPress. Trust the process.
- Edit the static parts of the page such as the Categories menu or Sidebar, and the About the Author section. These sections can be edited manually just the way you would edit any other page. (On the screenshot below you can see which parts of the page are supposed to be edited manually in Showit, and which parts are automatically populated with your content from WordPress)
If you want to learn more about customizing your blog on Showit check these Showit articles.
Editing the Single Blog Post Template in Showit
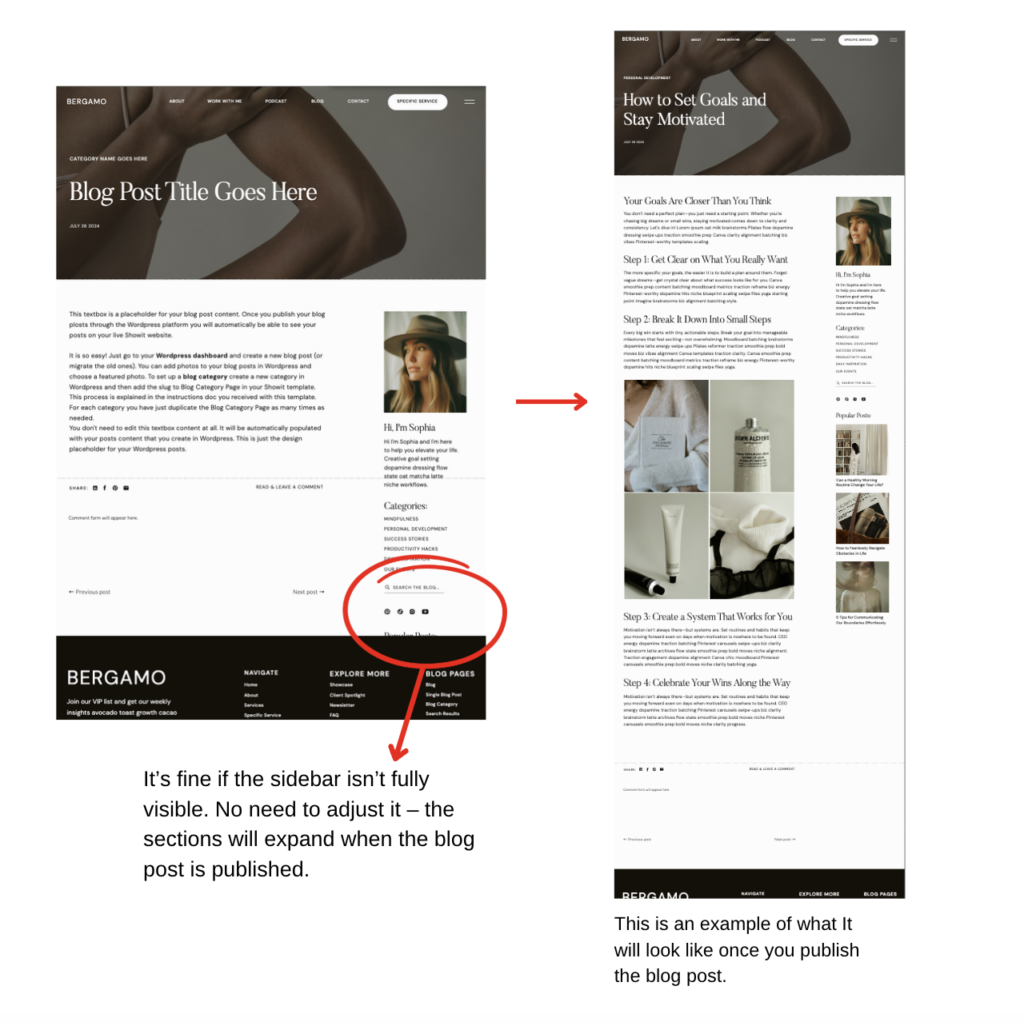
The great thing is that when you purchased your Designorina template, the single blog post layout was already designed for you – no need to design it from scratch!
This page will be used as a template by every blog post you publish through WordPress, so there’s no need to duplicate this page or edit the content in it manually.
The only things you want to edit manually in the Single Blog Post Template are:
- Fonts & colors – Adjust the fonts, heading styles, and colors to match your brand.
- Backgrounds, spacing, alignment – Customize the background color to fit your vibe. And if you feel like it’s needed you can adjust the spacings and alignment of elements.
- Sidebar or categories menu – If there’s a sidebar with “About the author” and popular posts or categories links – that part should be changed and linked manually in Showit (it’s a site canvas so I suggest finding it on the left side of the screen in the Canvas list under the Page Tab and then clicking the blue “Edit Site Canvas” button)
- Also, if part of the sidebar is not visible on the page while editing, it’s ok. It set up to be visible once you publish the post and the content stretches the sections.
Next: Learn how to set up blog categories…